Friday, October 15, 2010

Secretive Salmon


A lot of people ask me where I get ideas for my recipes. Honestly? It’s usually just a matter of convenience- it’s whatever I have under hand at the moment. Hence, this recipe where salmon meets garden herbs. 

My dad came home with some salmon steaks for dinner and groaned when I ran for my stack of cookbooks. Why couldn’t I just cut to the chase for once and cook the steaks plain? Realizing my family was too hungry to have the patience for a long involved recipe, I promised to keep things simple. Still, it’s me, and I hate cooking without marinades. I grabbed a few herbs from the garden and threw them in with some olive oil. The steaks marinated secretly while my dad set up the grill.

If you’re looking for a quick dinner recipe, this is it!

Lemon Salmon with Mint

4 salmon steaks
1 cup olive oil
1/3 cup lemon juice
1 lemon (sliced)
1 handful mint (chopped)
1 clove garlic (minced/crushed)
a few leaves basil (Not really necessary, but I can’t wander past basil without picking some and throwing it into whatever I’m cooking. It’s a problem.)
Salt & Pepper

1. Combine oil, lemon juice, mint, basil, garlic, salt and pepper in a small pot and warm over a lowish heat for a few moments. The heat will help the herbs release their flavor, allowing it to spread through the olive oil.
2. Place salmon steaks in a shall bowl.
3. Pour the marinade over the salmon steaks, making sure to coat all sides.
4. Let sit covered for a half hour.
5. Throw those steaks on the grill or in a pan and let them sizzle!
6. Grill the lemon slices and use as a delicious decorative topping.

Tuesday, October 12, 2010

Conquering the Mighty Pumpkin


When my mother made pumpkin pie, she didn’t mess around. With the palm of her hand, she held the large gourd firmly against a wooden cutting board. A quick flash of metal and she'd plunged her knife deep inside. Slicing downwards, she pryed the two halves apart, revealing the creamy orange interior. A few efficient whacks later and the pumpkin lay dismembered, its parts scattered about the counter.  My mother had conquered the noble pumpkin.

Imagine my surprise the first time somebody told me about canned pumpkin puree. The only work involved? A can opener and a pre-made crust. Oh and an egg if you were feeling fancy. It somehow felt like cheating. Technically it was homemade. But somehow it just didn’t feel right. Still, I’ve spent the past few years making pumpkin pies with said puree because the thought of wrestling pumpkins was just too intimidating.
I went home for Columbus Day and though the trip is only ever an oh-so-long distance of twenty miles, going off-campus always gives me a different perspective. I’d been so busy studying and running around to meetings for the past few weeks that I’d almost forgotten to look round for signs of fall. Sure enough, the leaves were threaded with red, their tips dipped in gold.  I felt sad that I had missed the transition and decided to take a break from the hectic pace for a while.

When my sister met me at the bus station, I declared my intention to grab the first pumpkin we saw and turn it into a pie.  Canned puree be damned, this was a day for REAL pumpkin pie. One of the perks of living in New England is the countless number of local farm stands. And so, a half a mile later we were the proud owners of a pair of orange sugar pumpkins.

My cleaver somehow felt inadequate. I positioned the tip of it against the thick orange skin and leaned hard.  The blade slid deep into the gut of pumpkin. Tilting the angle of knife, I pressed hard against its hilt. A heavy crunching sound later and the pumpkin lay open before me. Its seeds glistened white.

I felt somehow that I had performed some ancient coming-of-age feat. I was as powerful as my mother! There was nobody to celebrate with me though, so I just did a little jig in kitchen all by myself.

Pumpkin Puree

One large sugar pumpkin
2 tbs melted butter
¼ cup brown sugar
1/2 tbs cinnamon
1 heat proof bowl filled with water

1.     1. Preheat oven to 350 degrees and place the bowl with water inside it
2.     2. Slice pumpkin apart into manageable chunks (i.e. eighths or something like that) and remove seeds.
3.     3. Arrange slices on a baking sheet and brush them down with butter.
4.     4. Sprinkle liberally with the sugar and cinnamon
5.     5. Bake for about 40 minutes to an hour
6.     6. Remove pumpkin from oven and allow to cool
7.         7. Peel away the skin
8.     8. Puree that pumpkin!– I used a pastry slicer but     you could probably use something fancier like a food processor

The Pie

1 pie crust (recipe to follow…eventually :p)

2 ¼ cups pumpkin puree
2 eggs (beaten)
1/3 cup cream (or milk if you want to be healthy)
¾ cup brown sugar
2 teaspoons vanilla
½ teaspoon nutmeg
½ teaspoon cloves
½ tablespoon cinnamon
1 teaspoon lemon juice
¾ teaspoon salt

1.     1. Preheat oven to 375
2.    2. Mix all ingredients together in a large bowl.
3.   3. Pour into the chilled pie crust.
4.   4. Doesn’t get easier than that does it?
5.   5. Bake for 50 minutes

Friday, September 24, 2010

Decadence

Usually, I try to be sensible. Well, if your definition of sensible involves pie crusts with 1:1 ratios of butter to flour.
Sometimes, however, life calls for moments of absolute decadence. Even by my standards. It calls for:
Pastry crusts made entirely of chocolate;
the moment of delicious contrast when a whisk cuts sharply and thinly through the soft slurshing and whispering of bubbling caramel;
showers of liquor, and the resulting steam which fills the kitchen - warm, soft, exotic;
the slosh of generous servings of pure cream, all silky and white;
the tawny gloss of caramel waterfalls;
sprinklings of dark chocolate;
the shimmer of melted chocolate;

it calls for a complete lack of restraint;
it calls for Chocolate Caramel Tart.


Chocolate Caramel Tart

Chocolate Crust

1 1⁄2 cups flour
1⁄4 cup plus 1 tbsp. Dutch-process unsweetened
cocoa powder
1⁄4 tsp. salt
10 tbsp. unsalted butter, cubed and softened
1⁄2 cup plus sugar
2 egg yolks
1⁄2 tsp. almond extract

½ tsp. orange extract


  1. Mix the dry ingredients together in a small bowl.
  2. Cream the butter and sugar until fluffy and light colored.
  3. Add the egg yolks and beat thoroughly.
  4. Add the dry ingredients to the wet ingredients and mix well. I used an electric beater to make sure everything was really fluffy and well combined.
  5. Add the extracts. I think most people would have gone with vanilla. We ran out of vanilla and thus was born a wonderful new combination of flavors. Also, I’m a sucker for orange and chocolate anything. I also thought some almond flavor in the crust would help bolster the almond topping.
  6. Line your pie tin (or tins) with a 1/5 a centimeter of the dough all around.
  7. Put the pies in the freezer for 15 minutes (or fridge for 30) to rest for a bit.
  8. Preheat oven to 350 F and bake for 20 minutes. Or until the edges of crust are just starting to crisp up. Basically this is a cookie crust so follow the same rules as for cookies

Caramel


1 cup sugar

¼ cup water

1 large teaspoon lemon juice

¼ teaspoon salt

1 cup heavy cream

2 tablespoons unsalted butter

2-3 tablespoon bourbon


  1. In a heavy bottomed pan, mix first four ingredients and allow mixture to boil using a medium high heat. While waiting, be sure to stir occasionally and make sure it doesn’t burn. You may also want to brush down the sides of the pan with a brush dipped in water. The mixture sometimes splashes up onto the sides of the pan and the resulting burnt sugar crystals have a peculiar smell.
  2. Continue boiling for 5-7 minutes or until the resulting syrup is a light amber color. Once it begins to brown, it will darken very quickly so make sure to take it off before it gets very dark or you will burn it.
  3. Add the heavy cream. Be careful not to burn yourself as the syrup will bubble up furiously with the new addition. Stir well.
  4. Add the butter and continue stirring until it has melted.
  5. Add the bourbon to taste (or rather to smell since the syrup is far too hot to taste at this point)
  6. Let cool for about five minutes before pouring into the pie crust.

Chocolate Ganache

½ cup heavy cream

6 oz bittersweet chocolate


  1. Melt cream and chocolate together over a double boiler
  2. Allow to cool
  3. Pour over the caramel

Toasted Almonds


¼ cup almond slices

  1. Preheat oven to 375 F
  2. Lay almond slices on a cookie sheet
  3. Toast in oven for about ten minutes or until they become light brown
  4. Sprinkle over the tarts
  5. Put tarts in freezer for a half hour or until they have set

Thursday, September 16, 2010

Reasons Cooking Makes My Life So Sweet

The past 24 hours of my life have involved:
Huge chunks of chocolate

Which melted to become a pool of fragrant, liquid, silk
Which got poured into cake batter And became a fluffy, layered espresso chiffon cake with chocolate buttercream frosting. Also, ludicrously sized coop cookware:
The cake recipe called for 1/3 cup canola. We had a 5 gallon jug. Stephen helped me measure it out.
Katie using the world's biggest wok.Enthusiastic reactions to cake!

And finally, arriving at a meeting and realizing that instead of textbooks, my backpack contained cake ingredients, a spare plate, a frosting spreader and an electric egg beater.
For those interested in the cake recipe, I based it off a recipe from Smitten Kitchen (http://www.smittenkitchen.com/). Look for Espresso Chiffon Cake with Chocolate Fudge Frosting.

For the Fajitas, think oodles of portobello mushrooms, green peppers and onion. Saute the mix and season it all with cumin, red pepper, chopped fresh cilantro, crushed garlic and a dash of vinegar.

Tuesday, September 14, 2010

Tough Tomatoes - Dealing with Grumpy Veggies

Sometimes the cooking gods smile on my kitchen. Fresh veggies spill from all corners, my herbs and spices have all decided to stay in one sensible area (instead of slipping away to the far reaches of dark cupboards or in my backpack, or a friend’s house, or the food coop…) and the only thing in greater supply than my endless cookbooks are the self-created recipes popping up in my head. So many options and possibilities I can’t even stand it! Except that I love it.

This, of course, doesn’t always happen. Sometimes, ingredients are in short supply, spices mysteriously go missing, and inspiring ideas few and far between.

On one of the last summer afternoons in August, I invited a few friends over for our last dinner together before we headed back to school. As often happens, I grandly declared I would make dinner. But when I opened the fridge door a few hours before said dinner-date, I found its contents utterly disappointing. To be fair, the random assortment of forlorn and thoroughly limp and discouraged vegetables huddled together in the back of the fridge didn’t exactly try to be inspiring. They seemed to stare back at me in a quiet resentment that acknowledged that as the last survivors in my onslaught on the farmer’s market veggies, they were the least attractive ones of the bunch. All week long, I had pushed these aside in favor of their brighter, fresher or somehow tastier-looking companions.

And as for seasonings? Garlic, my most staple of all ingredients, had gone completely MIA! I have the bad habit of using garlic as a sort of security blanket. I have no idea how to cook without it. What to do?

Well, we all have to get pushed out of our comfort zone occasionally. And, hint, in case you want to stop reading because you think this story is going to end in a big disappointing mess, it has a really happy ending!


Basically, this recipe is a lesson in plumping, brightening, encouraging and otherwise bringing to life those occasionally tasteless ingredients we cooks encounter. It’s also about stretching the little taste those ingredients do have as far as it will possibly go.
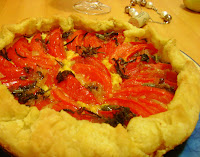

In this case, I created a freeform tomato tart. You will notice that tarts/quiches/pies are my common response to uninspiring ingredients. Buttery, flakey crust will go a long way towards making people happy. I can’t imagine how anybody eating such a beautiful thing as a crispy, golden pie crust could even think of complaining about the rest of the meal. But maybe that’s just me J I brought out the taste of the tomatoes using a quick marinade composed of shallot and fresh herbs simmered in olive oil. Throw everything together and yum!


Judging by speed with which the pie was eaten, I think I got the best of those grumpy ol’ tomatoes. The evening was spent in a glorious, end of summer haze of friendship, warm weather and food.


Free-Form Tomato Tart

- 4/5 medium sized tomatoes

- 1 large shallot

- 1/4 cup olive oil (minced)

- Herbs of all sorts (If you really want specifics, think a pinch each of rosemary, thyme, oregano, basil)

- 2 medium sized eggs

- 2 tbs milk

- Dash nutmeg

- 4 tablespoons feta crumbles

- 1 large tbs lemon juice

- salt and pepper


- 1 pie crust


Directions

1. Sprinkle the feta crumbles evenly over the pie crust.

2. Beat the eggs with the milk and pour over the feta. You're aiming for a thin layer of egg that will form a custard in the oven but you don't want to drown the crust so use your judgement. You should probably stop pouring the egg mixture once the whole bottom of the pie has a thin layer of egg mixture.

3. Sprinkle the tiny dash of ground nutmeg over the egg mixture. Nutmeg helps boost up and give texture and personality to the egg.

4. Slice tomatoes into eigths and arrange the slices prettily so that they fill up the crust.

5. Saute the shallot and rosemary in 2 tbs of the olive oil on medium high heat for about 2 minutes.

6. Add the rest of the olive oil and herbs. The choice of herbs is quite arbitrary. Different mixtures will have different tastes but as long as you stick with your basic Italian/French garden herbs, you're home safe!

7. Let everything simmer on very low heat for about 5 minutes. The point of this is to infuse the olive oil with the flavor of the various herbs. You're really stretching out what few ingrediants you have.

8. Drizzle the fragrant olive oil over the pie.

9. Salt and pepper to taste

10. Bake at 400 for about 30 minutes and then keep checking at 5 minute intervals until the crust is golden and the custard looks like it has set.

Friday, August 27, 2010

They Came from Mars


Yesterday, I found myself staring awkwardly at a giant fennel bulb. Its strange bulbous shape and tall, green, fuzz-topped stalks suggested its origin to be some foreign planet rather than the neighboring farm stand. My mom had asked me to prepare dinner but the only vegetables to be found were a dozen tomatoes and this. The tomatoes were exciting but fennel?? What was I supposed to do with that?
My initial reluctance to engage with fennel evaporated when I realized this would be an extreme exercise in listening to food. I had never cooked this plant before so I had no idea what spices and herbs would make it sing. I would have to let fennel guide me in the spice department. Fennel and I eyed each other warily. Would we get along?
After severing those strange stalks and scrubbing the bulb clean, I laid it out on a cutting board of dark wood. I admired its elegant curves; the way its white surface nearly glowed in the late afternoon light, luminescent against the darkness of the cutting board. Clean, strong and sensuous at the same time. I lowered a knife against its surface and watched as the first slice of fennel fell away in a delicate backwards swan dive. A sweet, high, nearly prickly smell rose into the air and tickled my nose. It was not unlike licorice but also had a hint of something like pinewoods. Interesting.
But how would I mix it with tomato?


A few minutes later, tomato and fennel simmered happily in a big pan along with some shallots and the only tiny half of a garlic clove I had managed to find. Hmmm how to season fennel… I started with easier task of making tomato a little brighter and more solid. Thyme and oregano sprinkled down into the pan. Then rosemary and sage were called upon to bridge the gap between fennel’s piney sharpness and tomato’s sweet fullness. Dried fennel seed helped ground the fresh fennel slices and bring out the robustness of the dish. Finally, I decided that if the licorice-y smell of fennel reminded me of baked goods, I should just go with that. Which of the cookie spices would work well with both tomato and fennel? Cloves!


I put the contents of the pan into a baking dish and topped the whole thing with the croutons that I had meanwhile been preparing. Salty and aromatic of fresh herbs, they would provide a contrast/compliment to the main dish. Bake for 15 minutes and sprinkle with parmesan if so desired.

As for fennel and me? We rode off happily into the sunset and lived happily ever after.


Fennel and Tomato Gratin
Gratin
- 5 normal sized tomatoes (or 3 large)
- 1 fennel bulb
- 3/4 large shallots
- 1 clove garlic
- 1 tablespoon lemon juice
- half teaspoon fennel seed
- rosemary, sage, oregano, thyme
-1/2 teaspoon ground cloves (careful not to overdo it!)
- tiniest pinch ground red pepper
- salt & pepper

Topping
- several slices bread
- 2 tbs minced bacon (optional)
- olive oil
- 1 shallot
- a few sprigs rosemary
- 7/8 leaves fresh sage
- 1 clove garlic (didn't have any when i made this dish but always recommend it for croutons)
1. Heat olive oil in a large pan and brown the minced shallots for a minute or two.
2. Remove the stalks from the fennel, scrub it clean, slice it thin and add to the pan.
3. Dice the tomatoes and add these to the pan.
4. Add various herbs, spices, lemon juice.
5. Cook partially covered over medium heat until the fennel softens up a bit. Probably about 15 minutes or so
6. Meanwhile, heat up another pan for the croutons. Sautee the bacon, garlic and shallots in a little olive oil to make the oil very flavorful.
7. Chop the bread into roughly 1 inch sized croutons and toss the croutons into the pan.
8. The heat should be relatively high so as to get the croutons crispy but not so high as to burn things.
9. Use a half teaspoon or more of salt. I consider croutons to be glorified french fries so I tend to oversalt :p Use your judgement.
10. Preheat oven to 400 F
11. Pour the tomato fennel mexture into a baking dish.
12. Top with croutons when they are appropriately delicious and crispy
13. Sprinkle a little pepper over everything and pop it into the oven!
14. Bake for about 20 minutes.

When Fennel and I become Friends

Tuesday, August 24, 2010

Mini Plum Soufflés

Sweet, airy, moist (almost liquid in the center), these Mini Plum Soufflés feel as light as clouds.


Plum Soufflé

- ¾ pound plums

- 1/3 cup caster sugar

- 3 egg whites


  1. Preheat oven to 350˚ Fahrenheit.

  2. Butter ramekins (or cupcake tin J ) and coat each one with a little bit of caster sugar.

  3. Slice the plums in half and remove pits.

  4. Boil plums down with a little water until they are quite mushy

  5. Use a food processor to puree the meats and skins.
  6. Strain the puree so as to remove any big chunks or remaining pieces of skin.

  7. Melt down the caster sugar in about two tablespoons water. You will want to remove it from the heat as soon as it is all melted and perfectly transparent in color. Make sure not to burn it!
  8. While the sugar melts, beat the egg whites until stiff.
  9. Pour melted sugar into egg whites while continuing to beat. Stop beating as soon as the sugar is incorporated.
    Using a spatula, gently incorporate the plum mixture into the egg whites. Be gentle but swift. You really want to avoid breaking the egg white bubbles.
  10. Fill ramekins with mixture.
  11. Bake for about 15 minutes. BE SURE NOT TO OPEN OVEN DOOR or you will cause the soufflés to collapse.


  12. Serve immediately.

  13. I find that the soufflés have a bit of an intensely sweet taste. Serving them with freshly made whip-cream will provide a wonderful cool contrast. Put a little of each on your spoon; the soft, sweet bubbles of the soufflé collapsing on your tongue to make way for a clear, cool rush of white cream.

This recipe is based off the Plum Souffle recipe found on http://www.recipes4us.co.uk/.

When Bourbon took Peaches Dancing

I’ve been on a pie baking bent lately. My favorite part of summer: the mounds and mounds of fresh fruit waiting to jump into flakey, buttery pie crusts. My least favorite part of summer is that not all fruits were created equal. Even the most promising farm stand can occasionally deliver completely tasteless fruits. This was the case for me a few days ago. I had spent a warm, golden August afternoon on the beach with nothing to do but daydream about pie recipes. We had made evening plans for dinner and croquet at the beautiful old house of a family friend. Lying half asleep on the soft sand, I could just picture a beautifully latticed peach pie sitting in her restored colonial kitchen.

On the way home, I stopped at a farm stand to pick up the promising fruit. There they were. All pink and red and creamy yellow: end of summer peaches. But when I reached out to pick one up and smell it, my hand touched the cold, hard, sterile surface of refrigerated peaches. Local these most certainly were not. I closed my eyes and hoped for at least a wiff of summer sunshine. But no; these peaches did not emit even the slightest hint of a smell. What to do? I had been promising everyone peach pies all day.

Wandering through the displays of fruit, I caught sight of some late strawberries. Peeping out at me, all ruby red, they seemed to hold the promise of sweetness lacking in the peaches. They even smelled sweet! But a pie composed entirely of strawberries sounded a bit too mushy. I really had my mind set on the satisfying bulk and slightly more resistant mouth-feel of peaches. I finally decided I would combine the two in my pie; peaches providing substance and strawberries enrobing my somewhat tasteless peaches with a high note of sweetness.

An hour later, I stood in my kitchen completely puzzled. The beautiful golden curves of peaches slices lay in a cheerful jumble of pink strawberry slices; the mix covered in a generous sprinkling of brown sugar and vanilla. It should have tasted amazing. Instead, as I stood by the mix with dripping tasting spoon still in hand, I realized that the strawberries, though still beautifully scented, had too muted and round a taste to lift up the decidedly recalcitrant peaches. To make matters worse, I had doused the whole thing with a tablespoon of vanilla; yet another low, round taste. The taste combination slid right to the back of my mouth, without even bothering to interact with the front of my tongue. I offered a taste to my sister. “hmmm.. That’s nice… I guess”. Clearly it was not. It was boring as hell.

I tried to add some lemon juice. Now there was a note of lightness. The front of my tongue tasted sweet summer sunshine while the back of my mouth enjoyed the warm, brown tastes of the other ingredients. But somewhere in between there was a gap. If the ingredients in my pie were at a party, strawberry, peaches, vanilla and brown sugar were the well-behaved, well-bred guests who sit in quiet whispering pairs at the back of the room trying desperately to ignore lemon’s bright, strident and somewhat gauche attempts at conversation. How could I bring them together? I went round my kitchen sniffing various spices and liquors. Finally, I found it. Bourbon. With a high scent but warm, round mouth feel, it provided the perfect link. Or maybe the alcohol just broke down the ingredients’ inhibitions. It turns out that peaches could make quite the combination with lemon once they forgot to be snobby and stopped trying so hard to keep to themselves. Whatever the case, they were soon partying together in a wonderful array of colors and tastes; lemon dancing the night away with fruit slices.

Satisfied, I sealed the whole thing in a golden crust. And yes, it looked just as beautiful on that colonial counter top as I had imagined.


Peach Pie with Strawberries and Lemon


5 large peaches – peeled and sliced thinly
½ pound strawberries- sliced
2 or 3 tablespoons dark brown sugar
1 tablespoon cornstarch
1.5 tablespoons lemon juice
2 tablespoons Bourbon
Dash salt

1 pie crust (recipe to follow)

1. Prepare peaches and strawberries
2. Mix all ingredients together in a large bowl and allow them to sit for about 10 minutes (you can roll out the pie dough during this time).
3. Preheat oven to 400˚
4. Spoon the wet ingredients into the waiting pie crust. The sugar will have melted into delicious syrup. While this is great as a marinade for your fruits, you may find that if you put it all into your pie, your dough gets a bit mushy and soupy. I like to use a slotted spoon at this stage so as to be able to avoid putting excess liquid into my pie. However, it’s really up to you and your pie preferences. Some people don’t mind a more liquid pie filling. You can also always mix more corn starch or flour into the mix to help dry things up before transferring everything to the pie crust.
5. Bake for 20 minutes at 400˚. Reduce heat to 350˚ and continue baking for another 20 minutes or so. Remove when the crust is golden and firm and the filling has the consistency you desire.

Saturday, August 21, 2010

Corn and Black Bean Tortillas


4 large tortillas
1 can black beans
2 ears corn
1 onion
2 cloves garlic
2 table spoons olive oil
1 large tablespoon brown sugar
1 pinch each rosemary, oregano, cumin
1 block cheddar cheese (shredded)
1 green pepper
3 tomatoes
Lemon Juice to taste (Probably about 3 tablespoons)
Salt
Pepper

1. Begin by preparing all your ingredients. Mince the garlic, dice tomatoes, chop onions, cut green pepper into long thin slivers and shave the raw corn off of the cob.
2. Heat olive oil in a large pan. When you can feel the heat rising off of it, slide in the garlic. Let it simmer and bubble for just a minute but be careful not to let it burn as nothing smells stronger and more acrid than burnt garlic.

3. When the pieces of garlic are just beginning to turn a very light brown, tilt in the diced onions. Turn down the heat to about medium or medium low. Let simmer for a few minutes, stirring occasionally.
4. Add the brown sugar. Unlike regular sugar, brown sugar doesn’t have that high strident sweetness. Instead, it provides a warm round base taste which compliments the quick sharpness of the onion. The two tastes wrap around each other and provide a more solid and interesting base taste. Lean over and smell your ingredients warming in the pan- you’ll see what I mean.

5. Pour in the lemon juice. Lemon juice adds a certain lightness and freedom of spirit and it lifts up the taste combination a bit. It will also add more liquidity to the pan, though you can always provide this liquid by using a bit more olive oil or water.
6. Slide in the corn and the black beans and stir everything around a bit.
7. By sautéing the ingredients, you allow them to mingle for a while and blur some of the edges between them. Generally in cooking, you begin with a fairly straight forward list of simple ingredients and it’s moments like these that allow them to interact with and compliment one another. If you have the right combination, they will all bring out what’s best in one another.
8. Add the various herbs, salt and pepper. These will serve to bring out the highlights in each ingredient.
9. When this mixture smells so delicious that you can’t help but sneak tastes, it’s time to assemble
your quesadillas!
10. Preheat oven to 400˚ F
11. Place the tortillas onto cookie sheets and onto each one spoon out a quarter each of the sautéed mixture, the shredded cheese, green pepper and tomato.
12. Pop into oven and let bake for about ten minutes or until the cheese has melted and the edges of the tortillas look a bit crispy.